
The Email integration features allow clients to connect their email marketing platforms and authorize Julep to push a list of emails to the platform using the robust People Search segmentation filters available. Below is a list of currently available email platforms for integration:


How to Setup Integration
NOTE: Only Julep Project Admin users can enable these settings.
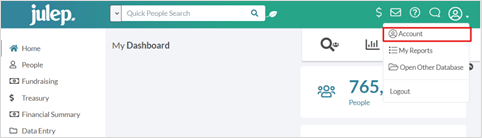
- Log into Julep and click on the
 My Account dropdown located in the top right corner of Julep and select the Account settings option.
- Click on the
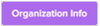 button that appears in the top right corner of the new window.
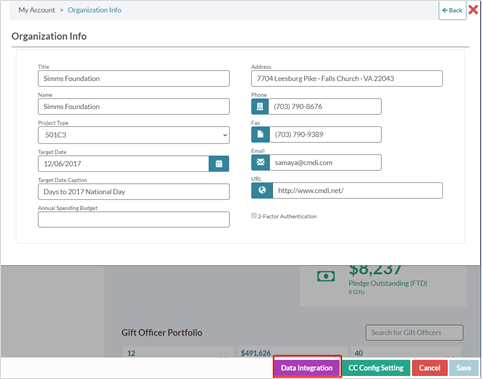
 - The Organization Info will appear. Click on
 at the footer of the screen.
- Select the desired email platform integration to be enabled for your account:


- You will be rerouted to your selected platform. Log into the selected platform.
- Once you have successfully been authorized by the platform, you may start creating new segmentation lists.
How to Upload a List
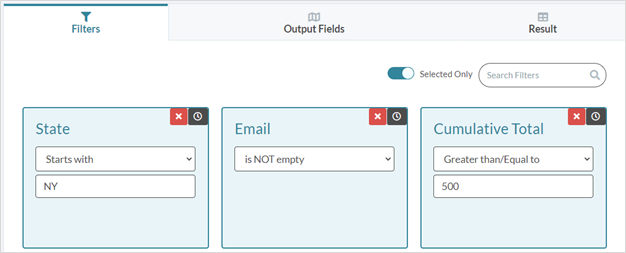
- Run a People Search using the filters of your choice. Ex:
- Choose the “Create Email List” menu in form the output options available.
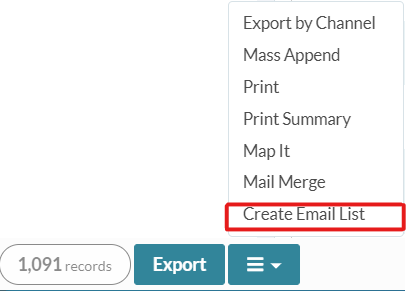
- Select an integrated Email Platform.

- Create the new List.
-
-
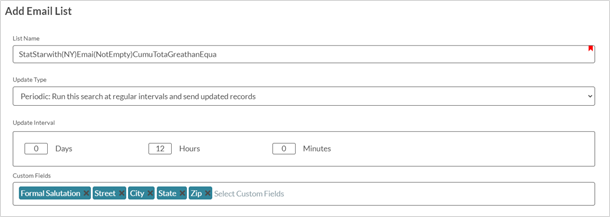
- Enter the preferred list name
- Choose an update type (One-time VS Periodic)
- If you select Periodic, you can select the preferred intervals of days, hours, or minutes (the list will default to 12 hours if none selected).
- Select any custom fields you would like to push to your email provider.
-
- Click Save when done.
- Once saved, the Julep Email Integration Service will queue will process to upload the subscriber details to the selected email platform.
- Once the upload is complete, you will receive a Julep Confirmation Notification.
- You can then check and email the new subscriber list in the email platform selected.
Manage “Periodic” Lists
- To manage “Periodic” syncing lists, click on the
 My Account dropdown located in the top right corner of Julep and select the Account settings option.
 - Click on the
 button that appears in the top right corner of the new window.
 - The Organization Info will appear. Click on

 at the footer of the screen.
 - Select the enabled email platform integration for review.
- Click the
 button under the correct account to view a list of “Periodic” syncing lists established.
 - View, Edit, or Delete the list as needed.

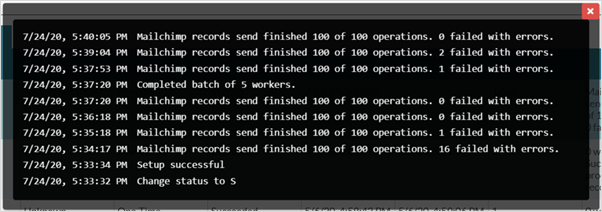
- Click
 to see the list of updates made to existing lists.
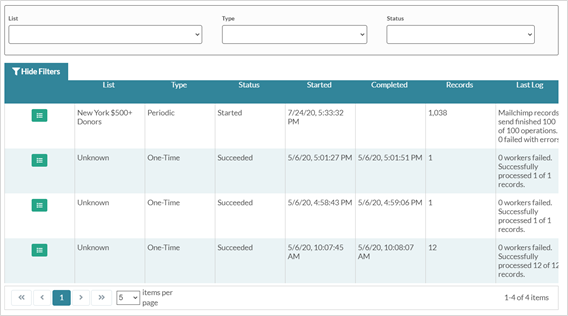
- Filter by list, type, or status or click
 to see the update log.
Comments
0 comments
Please sign in to leave a comment.